好久没写blog了,随便写一点。翻别人的blog,都是一些很高端的玩意儿
其实我在想这个标题的时候犹豫了很久,因为
想想好像是,于是
如果文章有错误疏漏之处,欢迎指正。
江来出了啥差错,我可是付不起泽任的,识得唔识得!
好不容易堆出一堆没啥用的东西。
这个教程仅面向于有服务器SSH,Git权限的玩家
其实这玩意儿没啥技术含量(
前戏
首先你需要一个 Coding 或其他 Git 账号,如何注册?
然后你得创建一个新项目。


库注意选择私有,项目名称有名称格式要求。
配置
你大可在服务器上直接跑 ssh & git ,有则会返回类似这样的东西
➜  ~ ssh
usage: ssh [-1246AaCfGgKkMNnqsTtVvXxYy] [-b bind_address] [-c cipher_spec]
           [-D [bind_address:]port] [-E log_file] [-e escape_char]
           [-F configfile] [-I pkcs11] [-i identity_file]
           [-J [user@]host[:port]] [-L address] [-l login_name] [-m mac_spec]
           [-O ctl_cmd] [-o option] [-p port] [-Q query_option] [-R address]
           [-S ctl_path] [-W host:port] [-w local_tun[:remote_tun]]
           [user@]hostname [command]
➜  ~ git
usage: git [--version] [--help] [-C ] [-c name=value]
           [--exec-path[=]] [--html-path] [--man-path] [--info-path]
           [-p | --paginate | --no-pager] [--no-replace-objects] [--bare]
           [--git-dir=] [--work-tree=] [--namespace=]
            []
如果 ssh: command not found / git: command not found
你就选择原谅他/她。
如果你用 Redhat Linux,执行:sudo yum install openssh / sudo yum install git
如果你用 Ubuntu Linux,执行:sudo apt-get install openssh / sudo apt-get install git
如果你用 Arch Linux,执行:sudo pacman -S openssh / sudo pacman -S git
并且 y 。
然后你大可输入 ssh-keygen -t rsa,大概会出现下面的东西,连续enter三次就好了)
➜  ~ ssh-keygen -t rsa
Generating public/private rsa key pair.
Enter file in which to save the key (/root/.ssh/id_rsa):
Created directory '/root/.ssh'.
Enter passphrase (empty for no passphrase):
Enter same passphrase again:
Your identification has been saved in /root/.ssh/id_rsa.
Your public key has been saved in /root/.ssh/id_rsa.pub.
The key fingerprint is:
**:**:**:**:**:**:**:**:**:**:**:**:**:**:**:**
The key's randomart image is:
+--[ RSA 2048]----+
| .....o.B+.      |
|..o ...=.o .     |
| .Eo . o. o      |
|    .  ..+ o     |
|      o S * .    |
|       o . .     |
|                 |
|                 |
|                 |
+-----------------+
➜  ~
然后 ~/.ssh/ 就会出现 id_rsa 和 id_rsa.pub 俩玩意儿。
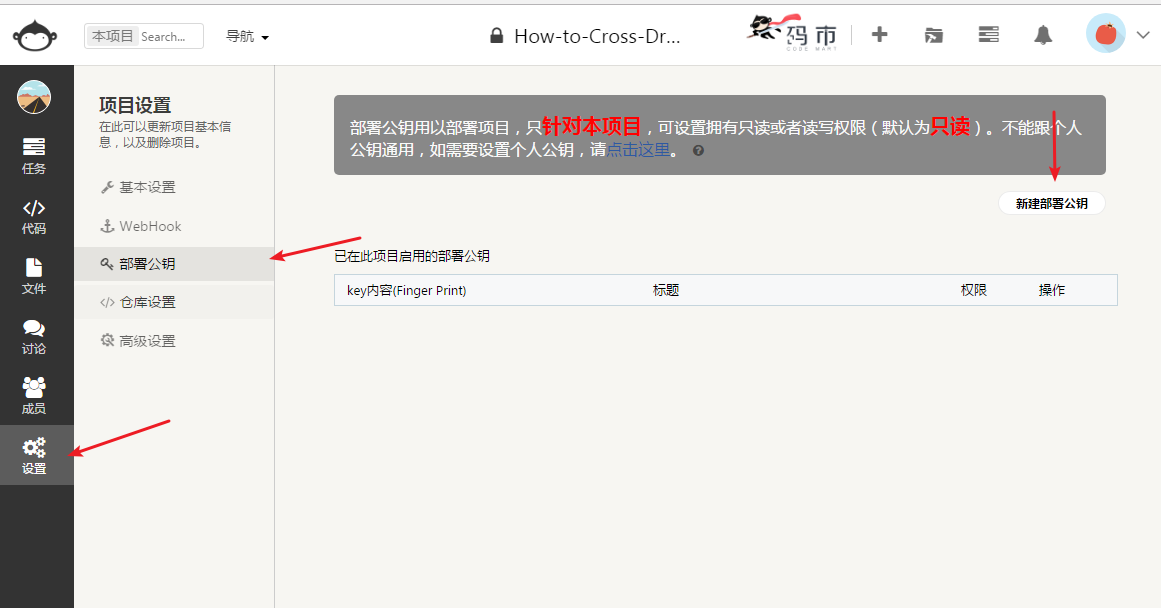
回到coding,点击设置,部署公钥,新建公钥

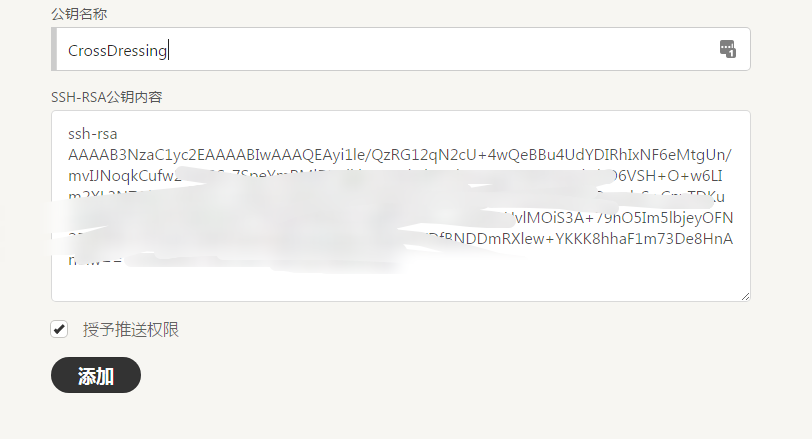
输入 cat ~/.ssh/id_rsa.pub ,把得到的东西粘贴到这,注意授予推送权限。

确定以后可以看到这玩意儿。

输入 git@git.coding.net 如果返回
Coding.net Tips : [Hello! You've connected to Coding.net via SSH. This is a deploy key.
就成功了,首次连接需要接受她的原谅,她会问你:
Are you sure you want to continue connecting (yes/no)?
你愿意接受我的原谅吗?输入 yes 即可。
否则返回检查步骤是否出错。
将 YourName 与 YourEmail 替换后执行
git config --global user.name "YourName"
git config --global user.email "YourEmail"
接着 cd 到文件目录执行(目录有文件请先备份,出了差错…)
git init
大概会返回
Initialized empty Git repository in '文件目录'/.git

然后到这里复制到类似 git@git.coding.net:xxx/How-to-Cross-Dressing.git 的东西,将你复制到的与下面 git@git.coding.net:xxx/How-to-Cross-Dressing.git 替换
执行
git remote add origin git@git.coding.net:xxx/How-to-Cross-Dressing.git
首次备份,执行
git add .
git commit -m "First Push."
git push origin master
返回
Counting objects: 3, done.
Writing objects: 100% (3/3), 231 bytes, done.
Total 3 (delta 0), reused 0 (delta 0)
To git@git.coding.net:xxx/How-to-Cross-Dressing.git
 * [new branch]      master -> master

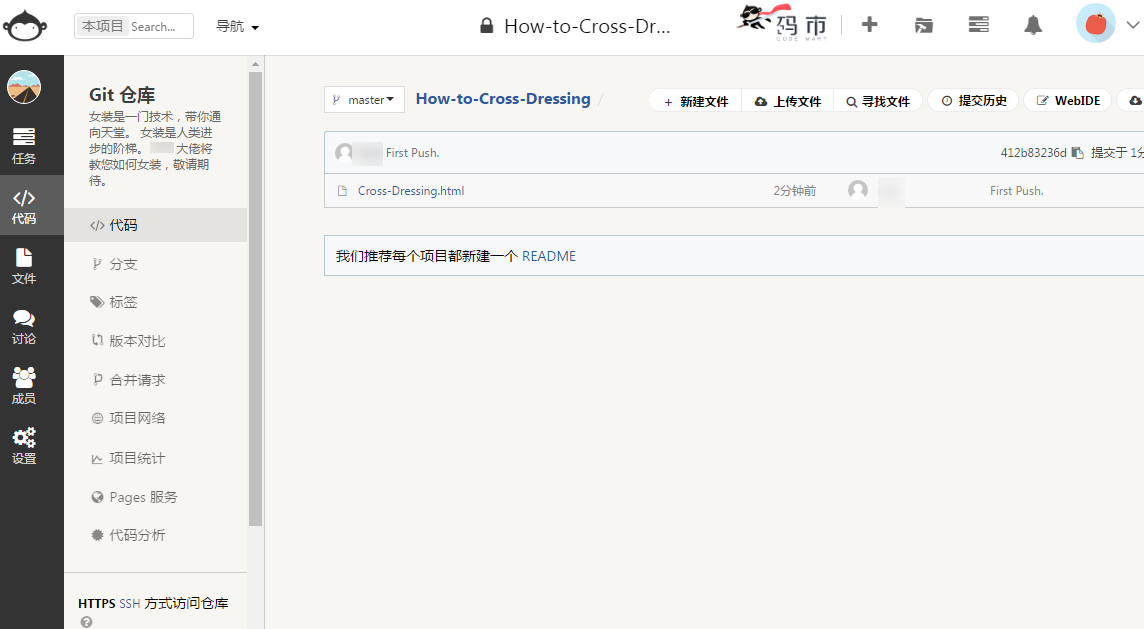
回到 Coding 刷新后即可看到新提交。
后戏
你需要一个 Crontab 来支持他运作。 > 如何宀女装
创建一个 sh 文件到任意位置,如 /home/a.sh 写入
cd 之前的git所在目录
git add -A .
git commit -m "$(date)"
git push origin master
输入 crontab -e ,写入
*/5 * * * * sh /home/a.sh
此处 /5 为每5分钟执行一次,你也可以按照crontab标准更改。
大功告成!
再次提醒。
江来出了啥差错,我可是付不起泽任的,识得唔识得!